Penny Stove Home
| Instructions & FAQs | Alcohol Stove Myths | Penny Wood Stove | Favorite Recipes | 1/2 Penny Instructions | Links

I share this stove to help help keep canisters out of landfills.
If you want to thank me, please send a check to your local
wilderness preservation fund.

Penny Stove HTML Instructions


The building instructions below are brief - designed for those that have previously built 'can' stoves. You should also check the Frequently Asked Questions shown below. Or, pint the PDFf Instructions and PDF FAQ's section shown on this page.

The following links show stove design options, additional construction tips and lighting instructions shared by stove users.

* If you want to use regular pop or beer cans, use these instructions:
Penny Stove 2.0

* If you use a very small pot or Heineken can pot, also visit:
1/2 Penny Small Pot Stoves
& How can I make a small pot stove?

* For some very helpful techniques and great video help:
Herbie's Stove Constructiion Tips

* For step-by-step instructions using only one Heineken can & three coke cans:
Stove Instructions by Bill Waite Penny


* For original super simple 2004 flash instructions:
Original Instructions.


Materials you need:
Three 12 oz. Heineken cans (or two and a pop can). Two drip irrigation stakes- or wire hanger, bike spokes etc.. One ft. of bailing wire- or solid copper wire etc.. One drier vent tube- or heavy foil etc..
Tools you need:
Although a good scout could make one with his knife, the following tools will do a cleaner job:
large scissors, hand drill with 1/16" bit, needle nose pliers. At least one friend to drink the extra beer.

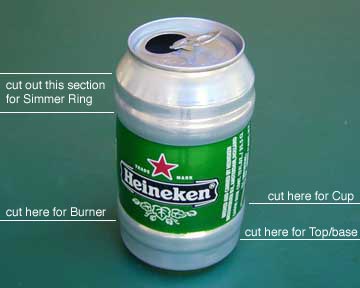
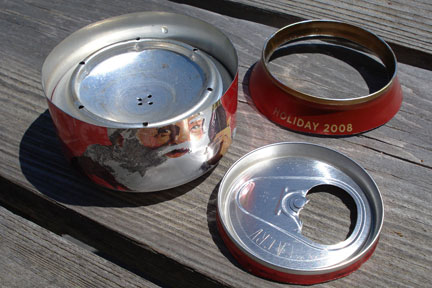
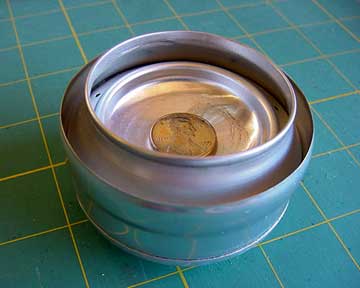
The Heineken can has raised bands that provide perfect diameter and spacing for all of the parts. Three cans are needed to make the stove. Another kind of pop or beer can actually works better for for the top/base. Cut with a knife and finish with large scissors.

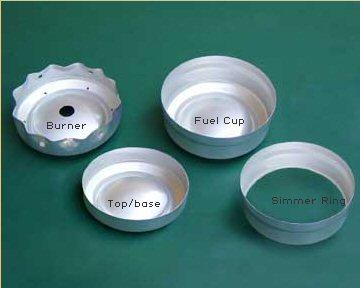
Top/base should be shorter than shown (about 1/2" tall). The Burner (3/4" tall) is cut off just below the first band. The Fuel Cup is cut off at the top of the band (making it about 1 1/4" tall). The Simmer ring uses the top band and complete top flat section (about 7/8 " tall).

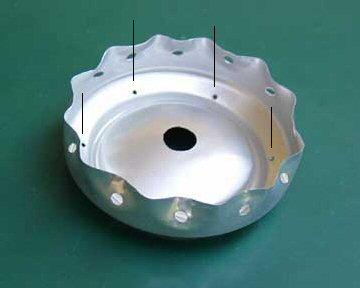
The burner has a 1/4" hole as show, or three 1/16" holes, drilled in the center and six 1/16" holes spaced outside the ring drilled vertically from outside the can (see lines). Needle nose pliers were used to make 12 dimples or folds. These must end 1/4" short of the top edge. Then, a small hole punch was used to make holes in the folds to release hot gases to the inside of burner. 12 are shown, but 6 (every other fold) tested just as good. If you don't have a punch, just drill 12 - 1/16" holes instead... it will work fine.

* WARNING
Apparently some new cans have numbers stamped on the bottom (Brian Kent found that at least some of the 12-pack cans do NOT have numbers). These bumps may keep the penny from sealing the burner opening allowing fuel to run under the penny before the stove gets hot or before you can light it. It may also let flame into the cup causing a POP that spreads burning alcohol.

The solution is to sand the Burner cup to remove the number bumps - 320 sand paper works fine. You can also use a socket and hammer to tap the penny into the Burner center to help it seal the opening - it should hold the fuel in the top cup indefinitely. Another solution is to use a regular pop (sprite) or beer (Guinness) can for the burner - (see Can I use a pop can burner without crimps? below).

In addition, a good safety solution is to drill 3 or 4 - 1/16" holes in the burner center instead of the single 1/4" hole. These must fit under the penny. This may keep flames out of the burner even if the penny is removed Mike Martin recommended this change.


The burner is carefully tapped into the fuel cup until it hits bottom and provides a tight seal. A clean press fit between the burner and the cup is important because it keeps primer fuel from draining and heated gasses from leaking while burning.

For best results, the burner top ridge should sit about 1/8" or 3mm below the top cup lip. The center of the burner should be about 1/4" or 6.5 mm from the bottom center of the cup - use a pin to reach thru a center hole. If it sits too high you cannot fill the top & outer ring easily, too low and a it will hold less fuel.

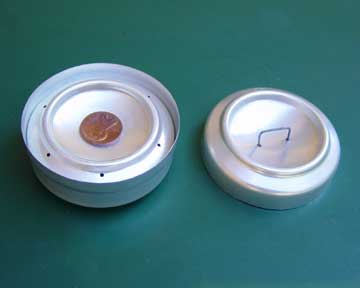
The top/base is used as an insulated support for the fuel cup. This helps keep a stable temperature in the stove and provides protection under the stove. I now use a soda can for the top/base and cut it down until the stove sits firmly without tipping. As Rob Lineberger suggests, you can may also want to polish the bottom to make a fire starting reflector as described at Wildwood Survival.

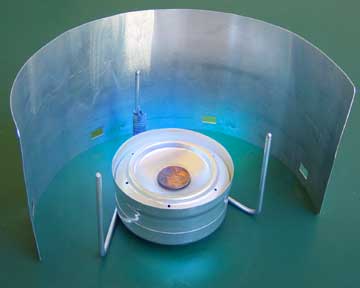
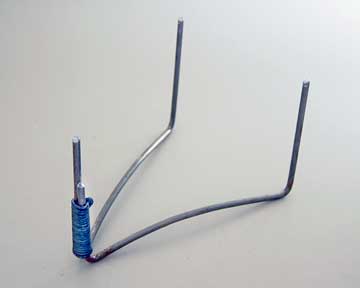
Two "U" shaped wires wrapped together with thin wire form the pot pupport. Drip irrigation stakes work best. Three legs make a stable base- supporting the pot at least 1" above the burner. My windscreen is a section of aluminum Dryer vent. Tests show that screen is not necessary in good weather and only increases one quart boil times by 30 seconds.

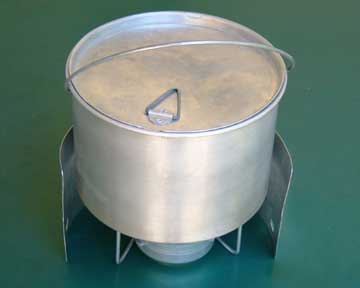
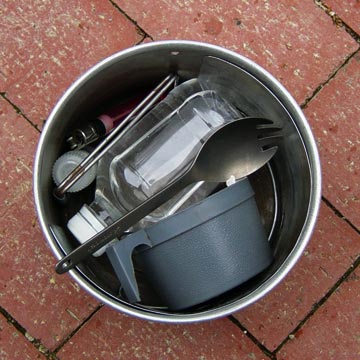
Modefied 2 quart Open Country pot (6oz.) is large enough to melt snow, sterilize water, wash clothes, or shampoo hair. The stove, support, and screen fit inside the pot (total 8.3oz). An 8oz. bottle of alcohol (about 12 fully cooked meals) fits inside along with a spork, cup, scrub pad, soap, matches, lighter, salt, pepper, coffee, tea, and towel. Total cook kit is less than 20oz.

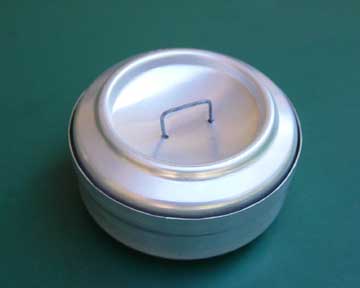
The top/base can be used as a cover for storage or to seal the stove and save fuel between meals. I now use the bottom of a pop can with one 1/16" hole in the bottom- it's lighter and fits tight without getting stuck - no need for the handle. Simmer ring slips over the bottom of the stove (not shown in this photo). The package is small enough to store inside of a plastic camp cup.


To Top

Frequently Asked Questions

What if the flame is too big?

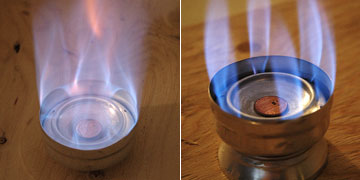
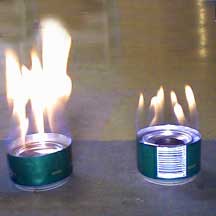
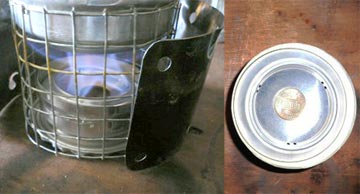
There is really only one thing that can go wrong with the construction of this stove - a leak between the cup and the burner. You can check by filling it in the dark - covering the penny to the top of the cup. Light and watch the edges and see if the fuel leaves the outer ring quickly - this would indicate a leak. Once primed, check and see if there is any flame around the edge of the cup - again indicating a leak.

The left picture shows the results of a leak between cup and burner. As flame burns in the gap, it can expand the cup and make the gap larger resulting in a flame thrower. To fix this you can fill the gap with JB Weld as outlined in the FAQ's section below.

The right photo shows the same stove after filling the gap with epoxy. It also shows another reason for a too hot burn - the jets are drilled too close to the outside of the burner. This also can heat the cup and overheat the stove. The fix here is to insert a drill bit and gently bend the jets toward the center. This stove will now function normally.

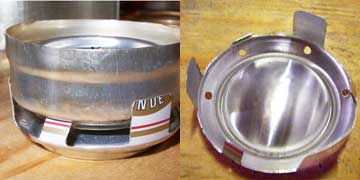
What if the fuel runs under the Penny too soon?

Apparently some of the new cans have numbers molded on the bottom. These bumps may keep the penny from sealing the burner opening allowing fuel to run under the penny before the stove gets hot. If this happens it sometimes lets flame enter the opening causing a disconcerting POP as fumes inside the Cup blow off the penny - this is not good. Also, sometimes the stove jets will not light because fuel has run into the cup before it is heated.

The easiest solution is to use a a smooth soda can or beer can for the burner. Brian Kent found that at least some of the Heineken cans that come in the 12-pack boxes do NOT have numbers stamped into the bottom. Or, you can sand the Burner cup to remove the number bumps - 320 wet/dry sand paper works fine. You can also use a socket and hammer to tap a nickel into the Burner center to to help make a seat. Or, rub the penny to grind a sooth surface. Either way, it must hold the fuel in the top cup indefinitely. Also, pennies produced after 1982 are not copper and don't work as well... so save the old ones :~)

Olivier Loria and Norman Stoddard suggested using a quarter instead of a penny to span the bottom number dents. I tried this and it seemed to work as expected. Because the quarter is heavier, the stove builds a bet more pressure, so the jets burn a little higher and the center flame a bit smaller (requiring a higher pot stand). A nickel also worked as expected. Both also took more time to drain priming fuel into the cup.

Another fix from Matt Myers:
"I cut a square piece of high temperature flute tape (from another stove design that wasn't very efficient) just a bit larger than the penny and covered the 1/4 inch hole. After smoothing the tape, I put the penny in the proper place and with a socket from my tool bench that was just a little smaller than the penny. I then tapped the socket with a hammer so that it would indent the tape and make a perfect seal. Then I just punched the 1/4 " hole again with a drill bit and finally had a great seal."

What if I don't drink?

You can make the stove with only one Heineken can and use soda or beer cans for the burner and base (see Bill Waite Penny Stove System ).
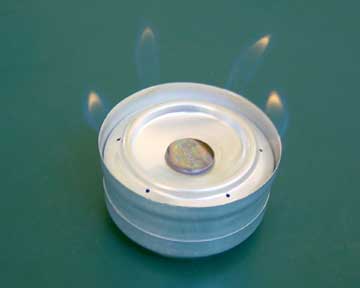
Or, make it entirely from soda cans - see Can I use soda cans instead? below.
Or, buy a six-pack of Heineken for a friend and have them save the cans. Make them a stove, they may even pay you back (you can supply the old penny).

How does it work?

Burning fuel in the center and outer ring of the burner heats the Cup and fuel. The heat causes fuel in the the center to run under the penny into the Cup and start to boil. Fuel in the outer ring lights the six Jets as gasses are released from boiling fuel in the Cup. The pot and wind screen reflect the heat and accelerate the heating process. The Base insulates the hot Cup to maintain a stable boil.
Jets continue to heat the Burner and lip of the Cup, increasing the boil and producing a full flame. Windy conditions will blow flames into the Cup lip increasing the boil and flame size. As heat builds up, pressure forces gasses under the penny to produce a central flame.
As the fuel level falls (or Simmer Ring is added), pressure falls and the penny seals to force all gasses out the six Jets maintaining stable heat to the Cup and optimum flame size to the pot.

What kind of alcohol should I use?

I use Denatured alcohol for tests but use Evearclear ethanol alcohol on the trail because I can drink it, use it to sterilize cuts, or to disinfect my hands and water containers - one bottle does it all!. DO NOT USE Rubbing Alcohol, it burns dirty and contains water that could cause a steam bubble and blow the penny off of the stove. Below are notes on extensive stove burn tests by Mike Martin:

Heet (Yellow Bottle) -- 99% Methanol, burns beautifully with little odor or flareups. Readily available at gas stations and auto parts stores. But, with only approx. 9700 BTU/lb, not as weight efficient as other fuels.
Sunnyside Denatured Alcohol (from Home Depot) -- Primarily Ethanol at around 12700 BTU/lb. Burns Ok, but fumes are bothersome to me.
S-L-X Denatured Alcohol (also from HD) -- Also primarily Ethanol (Duane Rapp did some research and found it to be half Methanol).
Burns just like the Sunnyside stuff, but the fumes are not as bad IMO.
Heet (Red Bottle) -- 99% Isopropanol, potentially over 14000 BTU/lb if you could get it to burn cleanly. But, burns with yellow flame and leaves sooty deposit on pots.
Swan 99% Isopropyl Alcohol -- Burns just like the Red Heet. Typical rubbing alcohol smell.
Everclear -- 95% Ethanol -- Not available everywhere. Very Expensive. Soot problems are minor compared to Isopropanol (Duane Rapp found the average posted energy densities of Methano and Ethanol and with SLX being 50/50 and Everclear being 95% wins by ~8.3 -8.9%).

E85 (85% ethanol/15% gasoline)
I do not recommend using this, however, David Lubertozzi found It produced: "very fast start, goes from "sterno" mode to full jets in about 15 sec, but burns with longer, richer jets (more orange flame, more black on the pot) for about 60 sec, then gradually goes back to normal. What I think happens is that the more volatile gasoline components come off as vapor first, since you're boiling the liquid you're essentially distilling the mixture. While probably not as efficient as pure EtOH, it seems pretty safe, may be a good alternative for improving cold weather start-up, and is cheap if you have an E85 station nearby - but you can't drink it ‡*}"

Solving the invisibility problem
A little table salt to any alcohol will make it visible, but Don Trapp "mixed 50% S-L-X Denatured Alcohol (from Home Depot) with 50% Isopropanol alcohol (Red Bottle of Heet from the gas station). The mixture makes enough yellow flame to make the fire visible, without creating as much soot as pure isopropanol gives. A mix of 73% (1 quart) SLX and 27% (1 bottle) Isopropanol worked as well. I got the idea from Daniel Perlman, who patented a mixture that includes water, in US Patent 5,858,031.

In Canada?
Marvin Shell recommends "Alcohol Stove Fuel" from Home Depot. He says that it's 99.9% methyl hydrate, "comes in a blue bottle and retails for about $4 a liter. Seems to burn very clean with no soot and almost no smell. Boiled water for 2 mugs of tea in about 5 min 20 sec."

What is the best way to light the stove?

To boil 2 cups:
1.
Set up the stove, support, pot, and windscreen (leaving at least 1/4" gap around the pot) on a flat, clean, solid, nonflammable surface. Then, remove the pot to access the stove.
2.
With the penny covering the hole(s), fill the center burner until fuel runs over the top and completely covers the jet holes. This will be about 1/2oz. (15ml.) of fuel. Some fuel may drain down the jet holes, this is normal and will actually help the stove to heat faster. Immediately put the pot back on the support.
3.
Carefully, without bumping the stove, use an open flame to light the burner from the edge of the cup - you may not see the flame so be careful. NEVER LIGHT THE STOVE UNLESS THE JETS ARE COVERED WITH FUEL. As stove warms, any fuel covering the penny will run into the cup and begin to boil. Fuel in the outside ring will light the jets. Burn time should be 5 to 5.5 min..

To slow cook 2 cups , boil very cold water or test the stove:
1.
With the penny covering the hole(s), fill the center burner to the very top of the stove - this will be about 2/3oz. (20ml.)
2.
After the pot has boiled (about 4 min.) remove the pot and drop the simmer ring over the burner (small side down). The simmer ring MUST be used with the pot. It will insulate the cup, slow the burn and simmer for about 5 times as long. If you're cooking real rice or dehydrated foods, you can put the simmer ring on before you light the stove. This will make the total burn time with 2/3 oz. 18 to 20 minutes and re-hydrate the food as it heats.

To fill for boiling one quart:
Fill the top, then side the penny aside to drain all the burner center fuel into the cup. Cover the hole(s) with the penny and fill the top again. This will total about about 1.2 oz. (40 ml.) of Fuel.

To fill for maximum burn time:
Slide the penny aside and fill the cup to the filler hole(s). Slide the penny over the hole and fill the burner top. this will total 1.5 -2 oz. of alcohol. This much fuel will take a long time to prime but heats like a "normal" stove as it heats the stove.
Jon Powel said his boiled "8 cups of water, 16 minutes, boils for an additional 3 minutes before 1.5oz fuel runs out." With the simmer ring it will burn for 40 to 50 minutes.

* WARNING
In five years, several people have informed me that when first lighting the stove, the penny popped off and alcohol blew out of the stove. I believe that this could be caused by moisture remaining in the stove after construction, or coating in the inside of new cans. So, be careful out there....and, just to be safe, NEVER LIGHT THE STOVE UNLESS THE JETS & PENNY ARE COVERED WITH FUEL.

How can I light the stove when it's really cold?

Sometimes, if it's really cold, the primer fuel in the outer ring burns out before the fuel boils and jets light. When this happens, I put my hand over the burner to make sure it is out. Then, add a few drops of fuel in the outer jets ring and light the stove again.

If you know that cold may be a problem, put a pot lid or bend a foil cup under the stove. Dribble a few drops of alcohol into this before lighting the stove. Then, light the fuel under the stove after you light the stove. This will heat the cup from the outside and also add more insulation under the stove. Or, use the great priming pan shown below - it can also still function as lid.

Jared "...modified the base to act as a primer. It only takes about 5-6 drops of fuel and gets the stove primed & roaring very quickly... "
This is the most efficient priming dish I have seen. For test videos showing how it works, go to: http://picasaweb.google.com/hiflyer.x/

Another option was suggested by Chris Harper in North Wales:
"I added some rockwool type insulation materiel around the outer part of the burner just as a starter wick, fill the cup and drain into hole, and add a squirt around the outer ring in the wick and light. It will light and run straight away after burning off the wick supply. Brilliant, as little as 10ml (we are quasi decimal here in UK!) will boil a 300ml mug."

How can I boil in less time?

The fast boil times are the result of the stoves efficiency - speed was not an original design goal. But, if you want to race your friends, or need that morning coffee a few seconds faster - like in 3+ min. - there are two things you can do: make it prime faster and/or make it burn hotter. Each will make the process a little less convenient and efficient however.

As Jeff has shown, a priming pan (or foil cup) under the stove will help achieve a faster full jet burn. Just light off a few drops of fuel under the stove to heat the cup from the outside as it is priming. I suggest that you consider the great priming pan design shown above.

To make it burn hotter, you can move the jets a little to the outside and closer to the top cup rim (or tweak the jets that way with a drill bit). This will make the cup hotter, and force more fuel under the penny at full burn. Or, make the cup lip taller. Oh, yes, you can also use a thinner pot, a larger diameter aluminum pot, or a pot with a black bottom (soot is good).

Why are there so few jets and why are they so big?

Several years ago, when I designed the stove, most high performance stoves had 24 tiny jets. Now many are down to just eight. I can only assume that this is based on testing as was my choice of six + the center burner used under full burn. David Lubertozzi use a #60 bit to make a Penny with twelve -0.040" burner holes to equal the same area as the original and found that it "didn't perform any better than six at 1/16", in fact a bit worse." Many have tried using multiple tiny holes with the same result. Whatever jet configuration you use, the size and number should be balanced to produce enough pressure to cause a center flame when the stove is fully heated, but no flame at the beginning and end of a burn. This helps to maintain a consistant flame contact with the pot.

The Penny jets produce a flame size about the same as those on a Viking stovetop. Obviously Viking thinks that big jets must be an effective way to burn gas and transfer heat to a pot and my tests confirm this. They are also less affected by wind, pot distance, altitude and the dirt that accompanies all backpacking trips.

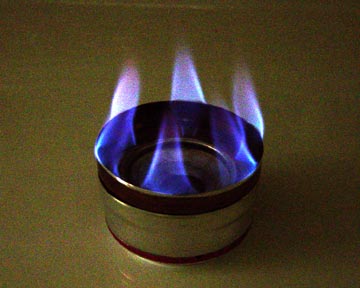
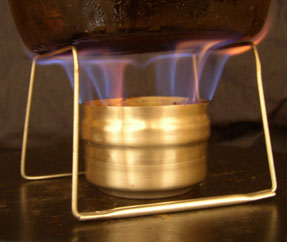
A gas stovetop burner has an open center to allow all jets 360° access to fresh oxygen. Alcohol stoves cannot have a central air supply. The Penny, unlike other pressure stoves, has spaced jets to allow oxygen to flow 360° around the flames and also to feed the central flame (just starting in this photo). Because the full pot bottom is heated by fully mixed fuel it heats faster and burns more efficiently.

How does the Simmer Ring work?

Do NOT extinguish the stove, just drop it on (small end down) whenever you want to slow the burn.* It shields the edge of the Cup from the flame, cools the Cup, and slows the alcohol boil. It also reduces the air supply and raises the smaller flame much closer to the pot for maximum efficiency. For maximum simmer time, you can start the stove with the ring in place.

The ring only continues to slow the burn with a pot in place to block excess oxygen from the jets. Without the pot, you may melt the ring! If you want a faster simmer, cut about 1/8" off of the top of the Ring to let in more air. To simmer longer, make it a little taller (or lower the pot). A 3/4" high ring, (1/2" below the pot) seems to be a good place to start.

Tests show that 1-1/3 oz. (40ml) will burn for about 40 - 50 min. 2/3 oz. (20ml) will burn for 18 - 20 min. 1/3 oz. (10ml) will burn for about 10 min. - heat 2 cups of water for perfect tea - no boil however.

Phil Perkins so far holds the unofficial simmer efficiency record:
"I just got done with a simmer test and found by using the original simmer ring I was able to simmer hot water for over 56 minutes. I used 1.25 oz. of denatured alcohol."

How can I drop the simmer ring on without burning Myself?

Have your friend do it...
Or, practice a few times before you light the stove.
Or, after you miss, push it over with a stick.
Or, if you know you will be simmering, and are not in a hurry, just put it on after you fill but before you light the stove.
Or, leave a tab connected to the top of the ring when you cut it.... hard to pack that way however.
James Jantzen made "two small cuts about 3/16 inches apart in the top of the ring and bend the tab out. Now you have a small tab to hold on to with a Leatherman... The only thing you have to watch is not putting the tab in postition that lines up with one of the holes in the stove."

What is the best way to cut the cans?

I spin the can and hold a Sharpie pen to mark the cut. You can use a book and set the pen on a page the holds it at the appropriate height.
I use a knife (exacto) to rough out the various pieces, leaving about 3/4" above the cut line. Then us scissors to make the final cut.
I 'grind' each piece on smooth concrete (fine sand paper) to perfect and dull the cut edge.

K. Rochon suggests you fill the cans withe water and freeze them. "This prevented the can from collapsing, and you could really put a hell of a lot of pressure on it if you wanted to. ...it made it SO much easier. In fact, I used a table saw with a metal cutting blade to all my cans up and there was no deformation."

What is the best way to insert the Burner?

I have always just tapped the burner into the Cup. I set a small measuring cup on top and tap with a wooden spoon. Recently, Mark Warren proposed this brilliant idea:

"When I assembled my Penny alcohol stove, I did some quick calculations and figured that if I heated the fuel Cup (to 400°F in my toaster oven) and cooled the Burner (to 0°F in my freezer) I would have - in theory - 0.002in of clearance to slide the burner in easily. It was easy in practice, however, I've only assembled one using this technique. Here are my calculations...
http://www.editgrid.com/user/mwarren/Aluminum_can_walls"
You may need to use oven mitts!

How can I evenly space the six jet holes?

You could make a pattern but this is not necessary. If they look evenly spaced, they are way good enough.
This is what I do:
1. Use a Sharpie to mark the center of the burner. Spin the burner to check and expand the dot until it is in the center.
2. Make two dots on the rim on top and bottom of the Burner (180°). Sit a straight edge vertically on top of the stove and make sure that all three dots are aligned. Adjust one rim dot if necessary.
3. Evenly space two dots on each side. Use the straight edge to check these with the center dot and adjust opposite dots as necessary.
4. Transfer the final rim dot locations down to the outside of the rim and drill. Use alcohol to wipe off Sharpie marks.

How can I make perfect Burner crimps?

This is what I do:
1. Using the six jet holes as a guide, make three equally spaced crimps. Put needle nose pliers 1/4" short of the top and bend down almost 90°. Adjust to make symmetrical folds.
2. Make another full crimp in the center of each fold. Adjust all six to make the folds equal.
3. Add one more crimp in the center of each of the six folds.
4. Make sure that the crimps don't distort the top edge, and, that all the folds are inside the diameter of the top edge. I roll the burner edge on a table to flatten any creases or folds around the top edge so they will not crease the Cup when I tap it in. If this happens use JB Weld to fill the seam as described below.

Can I use a soda can burner without crimps?

Yes, it will work almost as well. Most soda cans are a little smaller in diameter. Phil Perkins "found that by using an 8 oz. Pepsi can as the burner you don't need to crimp it. It slides right in." The burner side wall should be shorter - between 3/8" and 1/2". A non-crimped Burner will not heat quite as fast and buckle if tapped to hard into the Cup, and any bends could cause a leak, so go easy. I still recommend a soda can burner WITH crimps because it gives you essentially a double wall stove.

A soda can burner is thinner so I suggest that you seal the burner with JB Weld high temp. epoxy. First scrape or sand any coating from the seam and do as 'Cutman' describes here:
"After I pushed the burner all the way into the fuel cup and seated it fully, then I mixed the JB and using a toothpick applied it at the junction of the two parts, sort of like "caulking" the seam. I think it helped "pressurize" the stove without having any effect on the priming. I was careful to keep the epoxy right in the joint, and did not let it go up the side of the fuel cup or onto the burner part with the six holes in it".

Bob Mclaren had this fantastic solution:
" I used a soda can for the burner insert without crimping. For an effective seal I used a few wraps of plumbers Teflon tape; easier than epoxy."

Michael Hoernig said this:
I remembered that a Guinness 14.9oz Draught can... fits snuggly into the small diameter portion of the Heineken can. The advantages are obvious, you still have to choke down a Heineken, but you can wash out the taste with a Guinness. It's a perfect fit.
I sand the sides of the Guinness can slightly to remove the paint on the can and get a good heat transfer between the 2 side walls... then cut off the bottom to a height equal to the bottom of the ridge on the Heineken can. Since there is no gap between the sides of the fuel cup and the burner, I don't think there is any need to crimp or drill the sides of the burner... I found setting the burner up side down then pressing the fuel cup down over it works better then the other way around. The Heineken ridge, guides the burner into place, flip over and press down on the burner till it seats tightly.

Jonathan Fairhead had this experience:
" I got around to making the Penny Stove (using a soft drinks can (burner). No problems at all. Boils a pint in of water in just under 5 minutes (far quicker than my other stoves and with less fuel).
I made some modifications (just to suit my own peculiar needs). Also, I'll probably JB Weld the stove (as you warned, it is weaker than the beer can)."

Can I use a burner without punched holes?

The holes in the burner crimps let hot gasses access to the inside of the burner where the jets are. In some rare situations, like a really high fill, this releases the pressure and keeps the burner cup gap from leaking. You can build it without those holes however and it works fine almost all of the time. If you don't have a small punch, I suggest that you just use the same 1/16" burner drill bit to drill these in each crimp near the top. It will work just as well.

How do you make the pot support?

I used drip tubing stakes - about 6" long U shaped wires used to tie down drip irrigation lines.
First I straighten them, then I bent each into a wide U about 4" at the base and cut the vertical part to about 3" - this height will cut later to hold the pot at about 1 1/4" from the top lip of the stove. With my Base under the stove. my verticals are about 2 1/2" long.
I use masking tape to hole the two parts together as I wrap the two together with bailing wire.
For small pots I turn the support upside down.


WARNING!!!
This pot support could be VERY DANGEROUS when the pot is removed. Falling on the support could cause major damage. Always remove the support or turn upside down when not cooking.

Can I use other pot supports?

You can use any of the great pot support ideas found on the Web but it must let in lots of air and not reflect heat back to the stove. Also, make sure that the pot is at least 1" from the top of the cup rim. A little more distance will heat faster, simmer shorter and be more susceptible to the wind. Less distance will heat much slower and use much more fuel.
I like the double "U" support because it allows full flame contact with the pot and full air supply to the flame, and, does not suck heat from the pot or reflect heat back to the stove. It also folds to fit into almost any pot and keeps the pot from sliding. Also, it lets me slide the burner in or out and there are advantages to having the wind shield separate from the support.

Jim Grenfell and Leon Pantenburg "found the original design to be a bit wobbly" and came up with this great idea for their Scouts. The stove itself weighs in at just shy of 1 ounce; the kit that Grenfell and Pantenburg have developed includes "stove, "spork," coffee and condiment packets and a flask full of fuel, and weighs 2 pounds, 5 ounces. "They're the rage on the Pacific Crest Trail right now". See more at BendBullietin

Duane Rapp says "I got a length of 1/8" steel welding rod and made the bends like Bill Waite instructed. Instead of aluminum tubing, I just wound some 18-22 gage (cant remember what it is) solid strand copper wire (insulation removed) around the two supports. I used a 6" length of the steel rod, and made a 4" long straight section, with loops around on both ends. I slip the loops over both ends of the pot stand and it makes a much more stable stand...
PS if you go to Walmart RX counter and you ask nicely... they will give you a 10ml dose cup free (see it in the attached photo) Very handy when measuring fuel.

Milton Barker "used wire cutters to cut a section of light gauge “hog” wire in sufficient length to form a circular pot support... and you don’t have the concern of stab wounds. It is best to pack this base in a pot or it will be flattened even though it can be reshaped."

Damien Tougas made the beautiful support below, and says:
"I am quite happy with how the design turned out, it doesn't weigh too much (1.75 oz on my kitchen scale), so far it seems to be very stable, strong, and durable. I built it using 1/4" aluminum rod and 1/2" aluminum tubing both purchased from Home Depot. I had to drill out the tubing to widen the internal diameter, but I think I found a place online where I could get thinner-walled tubing which could eliminatethat problem."
It contains three identical modules and could be made with steel drip stakes.
A beautiful stove with polished fuel cup and 3 - 1/16" center holes.


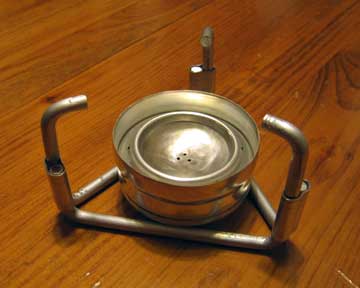
Can I use the BIG 24 oz. cans?

Yes, it makes a great base camp, boat, camper, or winter stove. Jesse Stovall followed the instructions but used big cans and says:
"I made my stove from 24 oz heiniken can seeing that was the only size they had at the store. I made them using your design just with the larger cans. With it i was able to get 16 oz to boil in 3:20 and 32 oz in 5:45. I was truly impressed with how fast it boiled such a large amount of water. My one and only complaint was that I didn't find this website before I spent 45$ on an MSR pocket rocket, thanks again. "

James Mullins of Ottawa reports from Canada:
... "I used the 710ml Hieny can. Works even better with a longer burn time. Great for a larger pot. Great, just great. My trusty but equally hazardous Coleman is going to get a rest.... I used a round (Canadian) nickel instead of a penny, and followed the advice to put three small filler holes in the centre instead of big one.... I have already amazed one camping buddy who spent over $100 on a tricky, temperamental Hi tech stove that requires special hard to find fuel and container."

Can I use soda cans instead?

Yes. This regular pop/beer can stove can be built with only two standard cans. The Burner is cut 3/4", crimped slightly around the bottom edge then carefully pressed into the cup. The cup is 1 1/4" tall and the pot should be set 7/8" to 1" above the top edge. This stove is best lit by filling the stove completely (2 oz.) to cover the penny. Or by using a base that helps heat the stove. Once lit, performance is similar to the original Penny - burn times with a full load of fuel is over 30 min. It will boil one quart of 60° water in about 11 minutes. If you normally boil only 2 cups, I suggest you check out the 1/2 Penny link at the top of the page. Don't forget to add the penny!

Howard Burnside summed up his experience:
"I've made several of these - the Heineken cans work best, and I used your penny idea with the Pepsi stove and it worked better than making the big open hole in the center..."

Tony Ciavarella built the stoves above to the recommended specs using Aussie beer cans. He found the flame "quiet aggressive, with flame height 2-3 inches....approx 40.5ml of...methanol...burned for 15 minutes...14 fluid oz to a rolling boil in 5min30sec, compared to 7min00sec for a Trangia... He increased the cup height and "made three burners cut at 19mm, 22mm and 30mm up from can base...with different burn rates, some better for simmering, some better for a quick boil."
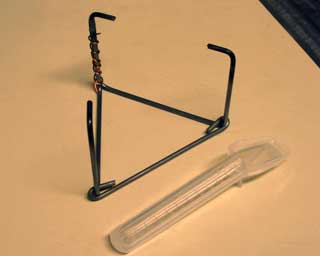
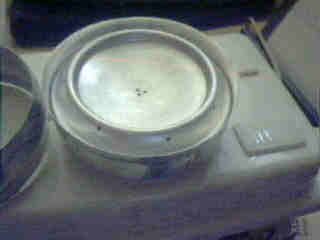
A shorter burner means a taller cup rim and more heat to boil fuel. Comparing the 19mm and 30mm stoves he found:
Fuel capacity (excluding priming fuel): 30mm-60ml, 19mm-49ml
Total burn time from full: 30mm-46min, 19mm-16min.
Time to boil 500ml water (from about 16 oC):30mm-10min, 19mm-6min30sec
Volume of fuel (excluding priming volume) to boil 500ml water: 30mm-13ml, 19mm-19ml
Fuel consumption (excludes priming fuel): 30mm-77ml/hour, 19mm-176ml/hour

Can I use those strange British cans

David Elder from the UK worked out the problems with making the stove using those UK Heineken cans with different proportions and a raised label area. He has just loaded his suggestions on a blog. He made a simmer ring and everything - see image below. I suggest that you visit David at:
http://pennystoveuk.wordpress.com

How can I make a small pot stove?

First, turn the pot support upside down. Then, light the stove with the Simmer Ring on. This will slow the burn but also focus the flame on the center of the pot. If you find the burn too slow, cut about 1/8" off of the top of the Ring to let in more air.

Or try the optional "Bill Waite Simmer Ring" shown above to focus more flame into the center. Bill "...used a can opener to remove the inside end (the top) of a Heineken can (leaving the rim) and it works super...The finished diameter of the ring end of the can... would work well for smaller pans. Some can openers work better than others. This is the model that I've used for cutting the ends out of hundreds of cans. http://www.seniorshops.com/goodgripcano.html "

Greg Vaillancourt was inspired by the Minibulldesign Nion2 that has jets positioned in pairs (right next to each other). Greg says that his tri-pared configuration shown above "really works well. The flames are focused and burn with a nice clean blue flame. A 1/16th" bit was used to drill the jets."
That wire pot support is holding a large Heineken can pot. A priming pan may be required to light using those internal jets. This is the best small pot full size Penny so far and should even work with the simmer ring.

Jared built Greg's tri-paired stove and "...modified the base to act as a primer. It only takes about 5-6 drops of fuel and gets the stove primed & roaring very quickly... using 1 1/4oz of Methanol and 2 cups of 70-degree-F water in the Heineken pot. It boiled in 5:30 from the time the pot went on the burner and kept boiling for another 5 minutes!"
This is the most efficient priming dish I have seen. For great burn test videos, go to: http://picasaweb.google.com/hiflyer.x/

Ken Schoenike made "...a stove using 4 holes for jets but inside the rim... this was a further help with my small diameter pot. .66 oz of alcohol will boil and simmer with no problem though the boil and total times are a bit longer that with the 6 hole model, which is what i would expect."
I have melted the penny this way however and it also requirse a priming dish.

Years ago, Lin McEnerny was the first to deal with this by using "...a darning needle in a cork to make the holes, resulting in smaller diameters, and I placed the holes just inside the lip instead of outside as Mark described. This actually pretty well eliminates flaming up the pot sides, takes just a minute more to heat the same amount of water but used less fuel."

More good options are shown on the 1/2 Penny Instructions .

How can I fix a leak between the Cup and Burner?

This is a very low pressure stove so a perfect seal is not necessary. However, a small leak can sometimes let priming fuel in the outer ring run down into the cup before the jets are lit... this IS a problem. Usually the leak is caused by a small crease in the Cup produced by a Burner crimp. A leak can sometimes overheat and expand the Cup and make the fuel burn too fast. This can also keep the simmer ring from working.
Here are some options if this is your problem:
1. Make sure the Burner is tapped all the way into the Cup. Sometimes it creeps up after the first few burns but will find a set and seal later.
2. Put the drill bit back into the jets and "bend" them to aim more to the inside of the stove. This will keep the flame from overheating and expanding the Cup.
3. For a trail fix, use a small stick to pack dirt (not sand) into the leaking area.
4 . Fill the gap with JB Weld high temperature epoxy (see "Can I make a burner without crimps?" above).
5. Spend 10 min. and make a new stove.

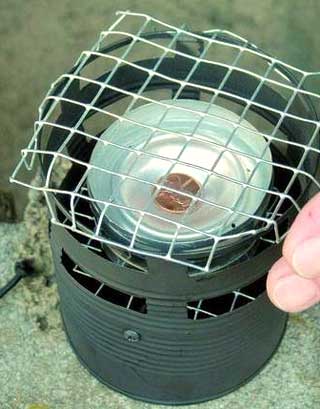
Can I use other wind screens?

Yes, tests show that a taller wind screen (or heat reflector) will sometimes improve efficiency and boiling times, but not as much as on other stoves. It is also much less affected by moving air. Also, this stove burns very hot and needs lots of air so make sure that intake holes and exhaust space around the pot are generous.

I have found that a 3/4 wind screen works well for me. It has only a few small holes so I can really block the wind on one side yet still supply plenty of a air on the other. It also lets me check the fire and even slide the stove in and out of the pot support. Also, it fits in the pot and is stiff enough to maintain its shape and not move around in the wind. If I need more protection, I can always block the wind with found objects -a rock, my shoe, some foil, etc..

Notes from extensive stove burn tests by Mike Martin:
"All of the unpressurized stoves were more sensitive to windscreen configuration than the Penny stoves for a couple of reasons:
a) The pressurized jets are less suseptible to being blown around than the low-speed flames of the unpressurized stoves.
b) The windscreen affects the temperature of the stove, and so affects the rate at which the fuel evaporates and burns. The penny regulator diminishes this effect by increasing the central flame if the stove starts to overheat. The central flame is located relatively far from the lip of the burner on the Penny stove, and so contributes less to heating the burner than the peripheral jets.
c) The windscreen affects the amount of oxygen available to the burner, and thus the burn rate. Again, the Penny regulator offsets this effect if the stove gets too much oxygen."

How do you pack this thing?

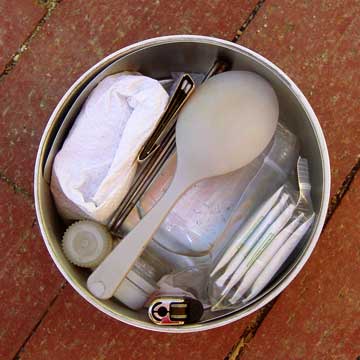
Modified Open Country pot, stove in cup, 8 oz. fuel, windscreen, pot support, lighter, matches, salt/pepper, pot bail, spork, pot scrubber (bottom). Coffee, tea, coco, and a few snacks sit on top and the lid holds everything together.

Ultralight and ultracheep version using a $6 K-Mart Grease Pot - with lid, stove, support & windscreen = 5.5 oz.. Set up for a long trip with 8 oz. of fuel, spoon, salt, lighter, matches & tea = 15 oz. total. I replaced the pot lid knob w/ cord for easy packing and added a bale wire from a paint can. Stove is wrapped in paper towel.

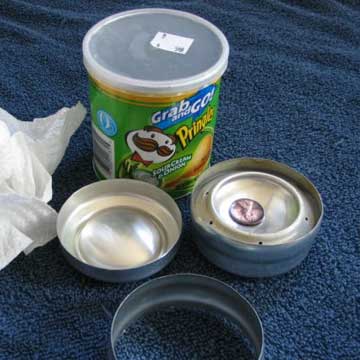
Small Pringlses Can idea for storing the stove outside the pot and/or for storing multiple stoves. Duane Rapp found that "There is enough room to pack one stove with cap/base, a standard and Bill Waite simmer ring. Use the paper towel to stop rattling. Alternatively, you can pack two stoves (second one minus cap/base) a standard simmer ring, and a Bill Waite simmer ring.
The big long super stacks of pringles (longer cans) can hold a couple of 4 oz Nalgeen squeeze bottles, anda pot stand."

My wife is concerned about my sanity - what do I do?

This is a common problem when one spends hours messing with old beer cans - or full ones for that matter. Playing with stoves can be addictive and I suggest that you think about some tips that I use with my addictions.

- Keep your equipment handy but out of sight - the trunk of a car for example.
- Have everything ready so that you can start a moments notice.
- Leave sales brochures and catalogs lying around in prominent places.
- When she leaves to go shopping, light up immediately.
- Don't forget to air the house out before she gets back....

Where did the penny idea come from?

I just wanted an efficient stove that I could make on the trail. And, having used an Optimus 8R pressurized gas stove for years, I knew that sealed self-pressurizing stoves often overheat and/or burn slow at the end when heat is needed most - they can also be very dangerous. After messing around with jet and center hole sizes, making low and no pressure stoves (similar to the newer Vargo), using the bottom of two cans (like Photon Stove), using a crimped burner as a double wall (like Pepsi Stove), and spaced jets to simulate an air jacket (like Cat Stove ), I realized that a center hole of any size would alter jet height during the burn. One day, looking for a low-tech way to regulate pressure, I dropped on a penny and that was it - the perfect solution. The six 1/16" jets that I was using turned out to provide the perfect pressure combination for optimum jet height and simmer. Later, when I first saw the shape of the Heineken can, I knew it would could provide the lid, base, proper jet spacing, priming fuel area, and insulating simmer ring. I was a little surprised that the self-filling, self- measuring, and self-priming features actually worked however. So, I guess it came to me like most good ideas do, some combination of experience, persistence, and luck - mixed with necessity and laziness. As my friend Bill Jones once said - "If I had all the right stuff, I'd never be able to design anything"...

So...How DOES the fuel get under the penny?

It's all very technical and complex. My guess is that the surface tension drops as the alcohol gets hot and the copper and aluminum heat at different rates causing a shift. At that point, divine intervention takes over as your mate comes in to ask if you plan to burn the house down......
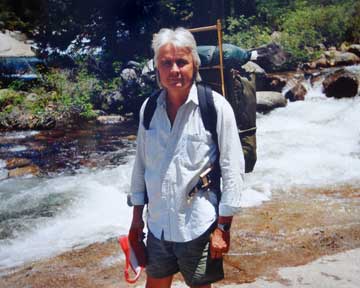
Who is Mark Jurey?

I'm an industrial designer and have been lightweight backpacking since before ripstop nylon - note recent pic of my 40 year old Stephenson tent and pack (2.5 lb. each). Over the years I survived heat, altitude, wind, rain, and an August blizzard that killed three heavily prepared packers. I learned valuable lessons about life and nature, including; If it can break, it probably will; The ultimate hi-tech solution is often the most basic; and, simple multi-use tools are the key to a happy and healthy adventure.

Early back country experiences went on to influence all aspects of my life. I studied design with Henry Dryfuss, Niels Diffrient, and Peter Pearce, a colleague of Buckminster Fuller - early pioneers in ergonomics, and preserving natural resources. My hiking experience helped me as a product designer. I took the adage "less is more" to the very edge - looking for simple ways to solve complex problems and still protect the environment - solutions that use minimum resources to perform an elegant dance with nature.

I went on to develop everything from educational toys to solar homes, TV shows to toilet seats, and kites to architectural building systems. But, the Penny Stove may be the best expression of my design philosophy - the ultimate hi-tech solution, available to anyone on the planet with access to a penny, a pocket knife, and a trash can. As a student at UCLA, our motto was - "there are no consumers, only users".

Mark Jurey
NoTrace~NotRace

My Backward Garden
Learning to live and grow with nature

www.jureystudio.com
Recent design work and portfolio


Disclaimer & Warning


WARNING!!!
The pot support used for this stove could be VERY DANGEROUS when the pot is removed. Falling on the support could cause major damage. Always remove the support or turn upside down when not cooking.

Information on this site is provided for educational purposes only.

Neither the webmaster nor anyone else whose information may be included on, or linked to, this web site can attest to or endorse the safety of using any techniques, equipment, supplies or services evaluated or referred to therein. Any endorsement or recommendation is limited solely to the evaluator's opinion about their effectiveness when used for their intended purpose in accordance with safe operating procedures, and if available, in accordance with any instructions provided by the inventor or manufacturer. Some survival and outdoors equipment and supplies are inherently unsafe and can injure, maim or kill even when used appropriately.
 
Endorsement or recommendation of any equipment, supplies, services or techniques does not constitute a guaranty or warranty the equipment, supplies, services or techniques will function when needed.

In daylight you may not be able to see a flame or hear an audible sound from an alcohol stove.  A windscreen wrapped partially around the stove may aid in seeing a flame more easily.
 
DO NOT OVERFILL STOVE. A space above the fuel inside stove is necessary for proper operation and overfilled liquid fuel may be ejected instead of alcohol vapor, creating a potentially hazardous fire.
 
Individuals not trained and experienced in use of tools and techniques mentioned on this page should not attempt creating a stove without supervision by someone with proper experience and training.
 
Eye protection should be worn whenever flying metal is possible (such as whenever a drill, hammer or knife is used).
 
Lighting of stoves should be attempted in a area not prone to fire.
 
Use of gasoline, or any other petroleum products in these stoves may result in severe burns and/or death.

Back to Top

©2004,5,6 mark jurey