| |
Cooking
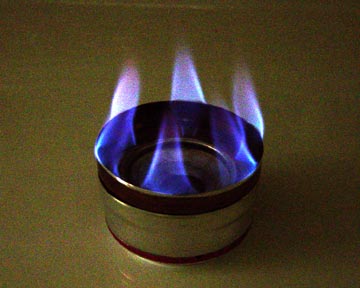
These recipes take advantage of the simmer ring to slow cook natural high energy one pot meals. Each uses one stovetop of fuel (about 2/3 oz.) and two cups of water to make one large single serving, or two "normal" portions. The meal will simmer for up to 20 minutes with little or no pot-watching. And, most will leave you with an easy to clean pot.
Most one pot meals are cooked the same way:
#1 Put two cups of water and the basic ingredients in the pot, then cover with the lid. Fill the top of the stove with fuel and light. After the jets light, carefully drop on the simmer ring.
#2 When the pot begins to boil (about 10 min) remove or crack the lid and stir in any "extra ingredients".
#3 When stove runs out of fuel, cover the pot and let it sit for 5 or 10 minutes. If it's cold, cover with a cozy, hat or jacket.
Ingredients
The ingredients can be cooked from scratch - real rice, real pasta, whole-grains ("Beyond Backpacking by Ray Jardine pg.191), fresh or dried vegetables, fish, meat and eggs. As with other packing basics, simplicity, versatility and light weight are the key. Most ingredients can be consumed for any meal, either raw or cooked. You can pre-assemble individual servings at home. However, I prefer to keep the ingredients in separate plastic bags, then mix to taste based on my appetite, nutritional needs, and daily cravings. Packing this way saves weight and space in your pack. With this kit of ingredients and a Penny Stove, you should be able so stay healthy, happy, and energetic in the back country for a very long time.
If you like
to assemble each gourmet meal at home, I suggest that you check out Mike Lancaster's recipes below, or onepanwonders.com .
The KIS ingredients kit
Even this Keep It Simple list provides all of the menu options below, and I can get them all at any market. The longer the trip the more variations of each category I take.
For each day of the trip I take:
* A hand full of beef jerky (fish, turkey, pork).
* A hand full of dried fruit.
* A hand full of dried tomatoes (onions, mushrooms, peppers, squash).
* A hand full of nuts (sunflower or pumpkin seeds).
* A few slices of toasted french bread (corn tortillas).
* Half quart portion powdered lemonade.
* Half quart portion powdered milk.
- One cup of rice (small pasta or Top Ramen).
- One quarter cup Steel Cut Irish Oatmeal (ground grains or instant cereal).
- Two tea bags (coffee, honey)
- Garlic powder (cinnamon, herb mix of sage, rosemary & thyme).
- Salt, pepper (olive oil).
- Two ounces of Everclear -the extra for tea or drinks.
* I eat these raw for cold meals and mix for slow cook one pot meals.
- I usually add one extra day's food for emergencies or to stay an extra day.
- I usually home dehydrate meat, tomatoes, onions, vegetables, fruit & bread, but fresh potatoes, fruits, vegetables and eggs are often a good option if you plan to cary water.
#1 - Rice and Whatever Looks Good
Real rice is one of the easiest and most versatile meals. There must be a reason that most of the world lives on rice. For high altitude trips, instant rice is a better option - it uses less fuel and probably will taste better.
#1 Add one cup rice and some combination of presoaked dehydrated meat, tomatoes, onions, and vegetables to two cups of salted water. If I cannot presoak, I add about an extra half cup of water at the beginning.
#2 After the pot boils, remove the lid and stir in some combination of nuts, pepper, garlic powder, dried herbs, and a few drops of olive oil.
#3 After stove goes out, cover and let stand 5 or 10 minutes.
Option:
If you happen to have a fresh trout lying around, you can cut it into large pieces and set on the dried rice at the start. Just watch for the bones...
#2 - Beef Tomato Stew
This is like the rice option above, but without the rice. I use round steak - cut into strips, and covered with seasoning to make my jerky. I cut tomatoes into quarters and onion into thin rounds/strips.
#1 Add a cup of beef or fish jerky and some combination of presoaked dehydrated tomatoes, onion, and vegetables and olive oil if you have it. Cover completely with water, or if not presoaked, add about an extra cup of water at the beginning.
#2 After the pot boils, remove or crack the lid to keep from boiling over. Usually the jerky provides any salt or seasoning required.
#3 After stove goes out, cover and let stand 5 or 10 minutes.
Option:
Use fresh fish instead of jerky.
Or, add some bullion or vegtable seasoning and extra water to make a nourishing soup.
#3 - Irish Oatmeal or Whole-kernel Grains
Real full grain oatmeal or other whole-kernel ground grains provide healthy long term energy. Ray Jardine says that instant oatmeal has the nutritional value of cardboard. He recommends his "way-of-life" combination of equal parts barley, oats, millet and corn. Mix your own blend at a health foods store.
#1 Add one quarter cup Oatmeal to two cups of salted water.
#2 After the pot boils, remove the lid and stir in some combination of dried fruit, sunflower seeds, nuts, cinnamon, honey, and a little powdered milk.
#3 After stove goes out, let it sit covered for as long as you can stand it.
Option:
If you like to hike in the morning, cook it the night before, put it in a zip-lock bag or sealed tub and eat it cold on the trail. It makes a great energy rich brunch.
#4 - Pasta or Macaroni
I haven't had much luck cooking pasta at any altitude over about 5,000 ft. However, whole-grain wheat and corn pasta is very good and provides lots of energy. The smaller the shape the faster it cooks.
#1 Boil two cups of salted water.
#2 After the pot boils, add the simmer ring. Remove the lid and add one cup of small pasta or macaronistir and some combination of dried tomatoes, dried onions, dried peppers or pepper flakes, garlic powder, herbs, and olive oil.
#3 After stove goes out, cover and let stand 5 or 10 minutes.
Option:
After stove goes out, mix in powdered milk, herbs, a few drops of olive oil, and if you have it, graded or small chunks of cheese. Cover and let it stand.
#5 - Top Ramen and What Ever Looks Good
Ramen noodles are easy to cook but not very healthy and the flavor packets are not very exciting. Adding dried vegetables, fish and/or meat can make a more balanced and tasty meal.
#1 Start with dried meat or fish and vegetables in two cups of water (pre soak if you can).
#2 After the pot boils, remove the lid and add the broken up package of Ramen noodles and add things like a few drops of olive oil, herbs, garlic power, dried onion, and maybe a dash of the original flavor packet.
#3 After stove goes out, cover and let stand 5 or 10 minutes.
#6 - Fruit Surprise Dessert
Some basic kit foods can be used to make tasty and healthy deserts.
#1 Add a one cup of mixed dried fruit to two cups of water - if possible, pre-soak for as long as you can.
#2 After the pot boils, remove the lid and mix in some combination of cinnamon, powdered lemonade, and/or honey.
#3 After stove goes out, cover and let stand 5 or 10 minutes. If you can, put the pot in a cold stream or snow bank.
Option:
Add a tea bag when you take it off the stove.
When it's time to server, mix in a lot of snow, pour a little Everclear alcohol on top and light for a flaming frozen treat.
#7 - Real Potatoes or Vegetables
Many people hike with an extra quart of water for emergencies. But, for this weight, you could carry a few large emergency potatoes or fresh vegetables. Eat them the first night and cary water for the remainder of the trip. Nothing nourishes and tastes better after a long hike.
#1 Cut up one large potato including the peel into 1" cubes, add to the pot and cover completely with salted water and dry herbs or garlic powder.
#2 After the pot boils, remove the lid.
#3 After stove goes out, cover and let stand 5 or 10 minutes.
Option:
Drain or drink the water and add salt, pepper, olive oil, and garlic powder.
Or leave the water and smash the potatoes with powdered milk and seasoning.
#8 - Real or Powdered Egg Frittata
Dried eggs are not that bad, and it seems ridiculous to bring eggs on a ultra-light trip. However, if you think of them as emergency water, it makes sense. And, you save fuel. They cook almost instantly so require only 10 or 15 ml. of fuel - just cover the jets. Just 1 oz. of fuel cooks eggs and a hot drink for two. To pack, cut off a section of the egg container, wrap with a rubber band, and put in a plastic bag - they will be safe once in your pack.
#1 Use olive oil to just cover the bottom of the pot - tip to run around sides. Cover this with dried vegetables (pre soak if you can) - tomato, onion, mushrooms, pepper, etc.
Use your cup to mix four + eggs & four + tbs. water or milk, salt, pepper, garlic powder, &/or basic herbs. Carefully dribble this on top of the veggies - cover and cook.
#2 After the pot boils for about 5 minutes, take it off the stove.
#3 Let stand 5 or 10 minutes and the steam will lift it from the bottom. Wipe the pot with a paper or dried leaves and it's ready for tea.
Options:
Simmer pre-soaked veggies in oil first, then add the egg mixture, cover, bring to boil and let sit.
Or, Set small chunks of cheese on the top before you cook.
Or, Set small chunks of trout on the bottom before you cook.
* Cooking on the trail is a joy -
I've been cooking on the trail for most of my life and have come to the conclusion that a simple blend of real foods is the best tonic for mind and body.
I often cook my big meal in the early afternoon while my cloths dry in the sun and my feet soak in a cool stream. I let my appetite tell me what I need: protein, fruit, vegetable or starch. The clean air, exercise, and slow pace of nature let me appreciate whatever concoction I come up with. Usually it tastes great - it's actually hard to make a bad meal from good food.
As the pot simmers on the stove, I check the map, take some pictures, record my thoughts, or take a nap. Half an hour of pure time to think about the trip ahead and the family that I miss. Real free time to be thankful for one more day of life with the bounty of nature. After a mid-day meal, I am recharged and ready to enjoy my hike through the cooling afternoon and look for sheltered spot to spend the night.
|
| |
Mountain Man Mike Lancaster's
Recipes, advise, and Drying Techiques
Drying techniques-
If you do not have a food drying method, try this method. Set oven to the lowest temp possible (usually about 170) and prop door open with a wooden spoon. This will get the oven to about 115 - 125 degrees and also keep the oven on, which is ideal for drying food.
I prefer to use an old newspaper display rack in my garage which is directly under a fan. Our summers are pretty hot so things dry quickly in my garage. If you have a food dehydrator or can build one from a cardboard box, light bulb and a computer fan then you are ahead of the game.
Remember the intent is to dry the food, not cook it further. Warm air that is moving dries food better than higher temps and little air flow. The wetter the ingredients are or the thicker the food is, the longer the drying time will be and marinara and refried beans usually require overnight drying, if not longer. When the top is dry and has no sheen, use a spatula to flip over the partially dried leather. Dry the second side until completely dried. The food will break into small pieces easily. Package into servings and freeze anything you don’t plan on using within two weeks.
Let your imagination go wild a little. There is no reason you can’t have real meat in your evening meal, one that might even remind you of grandma’s own bursting with flavor, nor is there any reason to settle for a freeze dried meal that plugs you up for a couple of days, but if that’s your style it’s good.
Baking on the Trail-
A couple of years ago I surprised a long time buddy of mine by baking a chocolate cake on a hike. I am positive others have done this before and some with those fancy trail ovens, but being a DIY guy it just wasn’t my style. I always trek with a piece of aluminum foil that is the right size to use as a windscreen and to form a big dome over my wood stove and pot/pan set up. The trick is to get a bed of coals big enough to get things hot but not so hot you burn everything. Think of a fire about the size of one in your wood stove but kicked out to about a 10” diameter. That will be about the size of the tent that serves as an oven. You may need to toss a couple of sticks on the fire to maintain temperature, but not many. The rewards are endless, but like most great things they take time. I may be the last one in camp each day, but I never eat alone and the hikers celebrating their birthday with chocolate cake with the raspberry glaze over it were head over heels.
Another method is to use your cooking pot and pan like a dutch oven, with coals below and on top of it. After all, your oven at home is just a bunch of hot air surrounding your food isn’t it? Twice as many coals on top as below will give even heating and rotating the pot can be tricky.
Spice, Spice, Baby Spice-
Spices and seasonings can really bring life to a meal and here is a way to bring along that burst of flavor for very little weight. Try using straws from fast food places (McDonalds seems wider than other places), folding them in half and making a plug from another straw. I bring salt, pepper, Italian seasoning, dried parsley, chili powder, even hot sauce. but again the imagination is the only limit. I keep the spice cabinet in a zip bag with all my kitchen goodies in case one leaks. I took a sander to a wooden spatula to make a trekking sized one and it works well with the non stick stuff I use.
Mike Lancaster's Favorite Recipes-
* Rotini & Meaty Marinara-
1 lb. ground beef 1 small onion, diced
1 jar (or can) of your favorite marinara 1 lb rotini
2 TBS olive oil Parmesan cheese
Italian seasoning, dried parsley, salt and pepper to taste
(4 servings)
Season and brown ground beef in a hot skillet, add onion and cook. Drain fat from ground beef. Place beef mixture a colander and run hot water over beef mixture until all fat has been rinsed away. Re season beef and mix with marinara. Spread into as thin a layer as possible on a large baking pan or cookie sheet (with a raised edge). Dry overnight, flipping as needed until dry to the touch. Package up to 2 servings in quart sized zip bag. Package rotini in snack sized zip bags, 1 serving per zip bag. Include 1 packet parmesan cheese from pizza parlor per serving. Include Italian seasoning and dried parsley in fast food straws and seal as part of a “spice cabinet”
Prepare in camp by pouring about 1 pint water over dried marinara and let steep as you build a fire (wood stove). Place pot over fire immediately and allow water to come to a boil. Add olive oil then rotini and simmer for about 12 minutes, longer if excess water. When the right consistency is achieved, sprinkle in Italian seasoning and dried parsley and blend in. Top with cheese and enjoy.
* Kicked up Chicken Ramen-
3 packages creamy chicken ramen 1 can chicken meat
½ lb frozen peas & carrots 2 TBS powdered milk
4 oz. sliced mushrooms (2 servings)
Spread vegetables, chicken onto cookie sheet keeping them separate from one another. Dry according to your preferred technique. I usually dry the vegetables and chicken in bulk then separate after drying, but this gives you an idea for the quantities used. I put ½ of the ramen in a quart zip bag and ½ of the chicken and veggies in a snack sized bag, with the powdered milk sprinkled into the ramen. I use the flavor pack too.
In camp, I use the same process of rehydrating the dried stuff and adding the ramen once the rest looks properly hydrated. Chicken that is dry to the bone takes longer to rehydrate and sometimes little bits of it are still tough.
* Beef, Bean, Rice & Cheese burritos-
1 lb ground beef 1 small onion
1 cup dried refried beans 1 cup minute rice
8 whole wheat tortillas red pepper flakes
(4 servings)
Season and brown ground beef with onion in a hot skillet. Drain beef mixture and run hot water over it until all fat is gone. Re season mixture and spread onto cookie sheet and dry according to your preferred technique. If dried refried beans are available, make your own by spreading out a 28 oz. can of refried beans onto a cookie sheet and drying it. This takes a lot of time because the beans are dense. Pack beef and beans in separate zip bags from rice as they rehydrate at different rates. 1 pack cheese per serving.
In camp, hydrate beef and beans into 1 pint water while building and starting fire. After about 10 minutes of combined soak and cook time, add the rice and mix. Add water if the mix is too thick, let simmer if too thin. Smear beef, bean and rice mix onto a tortilla, dress with cheese and pepper flakes.
* Shepards Pie-
3 cup instant potatoes 1 lb ground beef
3 cups peas, carrots & pearl onions 3 beef bullion cubes
butter buds (dried butter) salt & pepper to taste
(6 servings)
Season and brown ground beef in a hot skillet. Drain beef mixture and run hot water over it until all fat is gone. Re season mixture and spread onto cookie sheet and dry according to your preferred technique. Dry vegetables
according to preferred drying technique. Package beef and vegetables together, separate from instant potatoes.
In camp, make instant potatoes and reserve into another cup. Hydrate beef, bullion and vegetables into about 12 oz. water. Season to taste. Consistency should be slightly thick. Remove pot from wood stove, spread coals into a 10” circle, place pot on top of stove and top beef mix with instant potatoes. Sprinkle butter buds on potatoes, cover with lid and tent with foil. Bake for 10 minutes and serve. Baking is to brown the potatoes but not necessary.
* Chocolate cake with Raspberry glaze-
1/3 chocolate cake mix 1 egg
2 TBS oil 4 oz fresh raspberries
¼ cup sugar 1 tsp lemon juice
1 oz. brandy 1/8 cup chocolate chips
(8 really small pieces)
Mix sugar, lemon juice and raspberries and let stand for 30 minutes. Heat over low flame and blend until smooth. Work puree through sieve to remove seeds. Pour onto a sheet of wax paper and allow to dry.
In camp, rehydrate raspberry leather with brandy and 1 TBS water while dinner is being prepared. In baking dish (pot on pan), combine cake mix, oil, egg and enough water to have a thick batter. Add chocolate chips if desired. Spread coals out to a 10” circle, place baking dish on stove, cover and tent. Bake until a chocolate smell emanates, drizzle raspberry glaze over cake, let cool and enjoy.
* Apricot Cobbler-
1 cup add water only biscuit mix 1 cup dried apricots
1 oz. brandy 2 TBS granulated sugar
¼ cup brown sugar plus 1 TBS cinnamon to taste
(6 small servings)
Add granulated sugar and dash of cinnamon to biscuit mix before packaging.
In camp, hydrate apricots with brandy and 1 TBS water. Mix in ¼ cup brown sugar, cinnamon to taste and let stand. Add ¼ cup cold water to biscuit mix still in zip bag and knead. Take 2 /3 of the dough and form to bottom of baking pan, up the sides about an inch or so. Top with apricot filling and spread evenly. Form balance of dough into strips and cross hatch over filling. Sprinkle with balance of brown sugar and sprinkle cinnamon if desired. Spread coals to 10” circle, place baking dish on stove, cover and tent. Bake until you smell sweet apricots, remove from heat, let cool, enjoy.
Check out Mike's wood stove
|